Saturday, November 6, 2010

It's Fall! Pumkin Risotto with Brussels Sprouts

It's Fall! And while in San Francisco, that means weather that most people think feels like summer and leaves that don't turn any colors at all, it still makes me want to eat Fall foods like pumpkin, squash, brussels sprouts and lasagna. Yummmmmm. My sister emailed me a recipe for simple pumpkin risotto a few weeks ago and I decided to give it a try. Learning from my past experience making Risotto with Radicchio and Portobello Mushrooms, I thought I would top this dense, creamy dish with bitter, crispy brussels sprouts. A Fall food match made in heaven!

First set up the brussels sprouts. Cut the bottom of the stem off each sprout and clean off the outer leaves. Slice each sprout into at least three slices. In a mixing bowl, toss the sprouts with a little olive oil, a splash of balsamic vinegar, and a few shakes of salt, pepper, hot pepper flakes and nutritional yeast. Place the sprouts on a large baking sheet and bake at 375 degrees for about 20-25 minutes. Now make the risotto.

The risotto recipe is pretty much the usual one, with a few additions:
2 Tbsp. olive oil
1 medium onion, chopped
2 cloves, garlic
2 1/2 cups arborio rice
1/4 cup white wine
6 cups vegetable broth
2 Tbsp. lemon juice
1 can pumpkin
1/3 cup nutritional yeast
salt and pepper to taste

Heat all of the vegetable broth in a pot until hot, but not boiling. Meanwhile heat the oil in a large pan, then add onion and garlic and cook 2 minutes or so. Add the rice and cook an additional 2 minutes, stirring constantly. Add the wine and stir to scrape everything off the bottom of the pan. Add all of the broth, a little bit at a time, all the while stirring the rice. By the time all of the broth has been absorbed, the rice should be cooked and al dente. Always taste the rice several times during the process. If you need more liquid, that's fine. If you don't use all of it, that's fine too. Just stop when the rice tastes right. Lastly, mix in the lemon juice, pumpkin, yeast and salt and pepper.

Serve the pumpkin risotto topped with brussels sprouts and garnish with lightly toasted pumpkin seeds. This dish could not possibly get any better. This now beats out all other risotto recipes I've ever tasted. I know I've said this before, but I cannot say enough good things about the mixture of thick, rich, creamy risotto and something crisp and bitter. The brussels sprouts are THE perfect topping for this. So light a fire, bundle up, and make some pumpkin risotto! That is, unless you are in San Francisco. Then you should open all your windows, put on a tee shirt and make it anyway.


Monday, November 1, 2010

Smothered Cauliflower with Potatoes

I decided to try an entirely new recipe called Stuffed Cauliflower. I got this one from Vegetarian Times, and it sounded so crazy to me that I just had to try it. The result turned out to be something I would not actually call "stuffed" so I decided to call it Smothered Cauliflower. The flavors were fantastic, and it is a great new way to eat cauliflower as a new dish. Maybe I'll change the name to Smothered Cauliflower with Potatoes.

When I got started on this recipe, I truly had no idea what to expect. I didn't change a thing from the original recipe (except to use less oil...I can't help it, I'm my mother's daughter!) because I didn't feel that I understood the recipe well enough to stray from it. The result is a very unique and authentic Indian tasting dish that was completely satisfying while still being extremely healthy. Plus it looks hilarious!

First gather all of the ingredients:
1 medium-large head of cauliflower
1 medium onion, chopped
1/2 cup tomato sauce
1 jalapeno pepper, some seeds an
d ribs removed, chopped
1 1/2 Tbsp. grated fresh ginger
2 cloves garlic, pressed
1 tsp. whole cumin seeds
1 Tbsp. ground coriander
1/2 tsp. turmeric
1/2 tsp. cayenne pepper
1/2 tsp. garam masala
1 tsp. lemon juice
1 Tbsp. canola oil
1 large yukon gold potato, peeled, boiled and grated
6 medium yukon gold potatoes, sliced

First clean the cauliflower of all of its leaves and the thick, tough part of the stem. Place the entire head in a steamer basket (I have a tiny one that fits all the way in the bottom or a stock pot) with a couple inches of water and steam for about 10 minutes. This gives the cauliflower a head start on the cooking process. Meanwhile, preheat the oven to 400 degrees and boil your large potato in some water. I was a little confused by the instructions "peeled, boiled and grated" at first. This is one of those times when I wished I could have talked to the person who wrote the recipe to be sure I was doing it right. But I just went with my instinct and boiled the potato until fork-tender, then grated it on a large cheese grater. It fell apart a little bit, but it didn't seem to matter much.

Next combine the onion, tomato sauce, jalapeno, ginger, garlic and cumin seeds in a blender and blend until a thick paste forms. Heat a medium skillet, add the onion paste and cook for about 3-5 minutes. Stir in the coriander, turmeric, cayenne, garam masala and lemon juice and cook 2 minutes more. Remove from heat and stir in 1/2 cup water and the grated potato.

While you let the cauliflower and the tomato mixture cool a little bit, place the sliced potatoes in a bowl with hot water and let them sit for about 10 minutes. This removes some of the starch and allows the potatoes to cook up crispier. Drain the potatoes, pat dry and toss them with the remaining 1 Tbsp. canola oil.
Place the cauliflower in a large baking dish. This part gets a little messy, but I thought it was fun. Slowly take handfuls of the tomato mixture an smooth it all of the the outside of the cauliflower as if you were frosting a cake. It should stick fairly well and you should have enough to cover the entire head. I guess you could use a spoon to do this, but I found my hands worked quite well. When you are done, carefully add the potatoes around the edge of the pan and bake the whole thing for 25-30 minutes.

When it's done, this dish will smell incredible. Slice the cauliflower into thick "steaks" and serve with the potatoes. I don't quite know how to describe this dish, except to say that it tasted like authentic Indian food to me and it was a very nice change of pace. We loved it and will definitely make it again. I decided to serve the cauliflower and potatoes with a healthy serving of crispy kale chips, the (very simple) recipe for which you can find here.

Nutritional Facts: 1 serving = 1/3 cauliflower with 2 yukon gold potatoes. 415 calories; 9.8 g fat; 0.7 g saturated fat; 280 mg sodium; 81.3 g carbohydrate; 14.3 g dietary fiber; 15.2 g sugars; 14.3 g protein.

Monday, October 25, 2010

Don't Knock It 'Till You Try It! - In Defense of the Perfect Pea Soup

Split Pea Soup. Wah-wah. Not the most exciting meal, I know. But give it a try! Probably the only thing many people like about a traditional pea soup are the bits of ham or bacon, so that puts a vegan split pea soup even further behind. But stick with me please, because what follows is perhaps the easiest, healthiest, most delicious, most perfect meal ever. Pretty high praise, eh?

For some reason J has always loved split pea soup. The first time he mentioned this to me (probably about 5 years ago) I responded the way you are probably responding right now. "Pea soup? Um, I didn't know anyone not in a nursing home really ate that stuff. Is that made with actual peas? What is a so called 'split' pea? Don't you need a ham bone or something?" I was not impressed and decided to ignore his menu suggestion. Unfortunately for me, the pea soup idea did not end there.

New topic: When J and his brother get together, they have a tendency to remember parts of their childhood together by frequently quoting little bits of movies they used to enjoy in elementary school. They derive great pleasure from this activity. One such movie, The Rescuers Down Under, includes a brief segment about pea soup. Not only is this clip undeniably adorable, but J's impression of it is undeniably awesome. After a quick You Tube search, I was able to find a clip for you all to enjoy. Also enjoy the amazing quality of the videography.


Okay, so obviously I eventually (as in a few months ago) finally got around to making a split pea soup. I was bored and figured I should just give it a try. I, as usual, looked at as many recipes as I could find and put them all together to create a recipe that sounded good as well as vegan. The result is below:

2 cups dry split peas (As I quickly found out, a split pea is kind of like a lentil or bean)
7 cups low vegetable stock
1 yellow onion, diced
3 yukon gold potatoes, diced
2 carrots, diced
2 stalks celery, diced
1/2 tsp oregano
1/2 tsp basil
1/2 tsp parsley
1/2 tsp cumin
1/2 tsp black pepper
1 1/2 tsp salt
1 tsp liquid smoke
1/4 tsp cayenne pepper

Rinse the split peas and check for stones. (Apparently sometimes they like to include stones in with bags of split peas). Now comes the good part: place ALL ingredients in a soup pot and simmer loosely covered for about an hour and 15 minutes until peas are tender. I LOVE recipes that include the words "place all ingredients in a pot." Score. After simmering, blend the soup in a food processor. This may take two batches, or you can use an immersion blender. I like my soup thick and hearty...not too smooth, but not too chunky. You can decide how you like it.

To say I was blown away by this soup is an understatement. I could eat it all day and all night. It is the perfect lunch, the perfect dinner and even the perfect snack when you have the late night munchies. This soup is amazing. The morning after I made this soup for the first time, I emailed my entire immediate family and begged them to make it. I BEGGED them. I still don't think any of them have actually made it yet. Family members reading - please feel guilty now. You need to try this! I know you don't want to. You think pea soup is gross and looks like throw-up. The recipe does not sound exciting. I know! But try it anyway. Just try it. You will love it.

I loved it so much I forgot to take a picture of the finished product before we ate it. All of it.

Sunday, October 10, 2010

Mushroom, Sun Dried Tomato and Spinach Calzones

When I asked J a few weeks ago to name a few dishes that he would like me to try to vegan-ize, I was surprised at the scope of different things he named. I wrote them all down and so far, I've managed to give most of them a try. This one was kind of random, but actually quite successful: Vegan Calzones. I haven't eaten a calzone in years and years. My family will remember a short time during my childhood when we were really into the calzones at a now defunct Lexington restaurant named Bel Canto and the mere mention of a calzone made me feel strangely sentimental. I've never made a calzone before, vegan or otherwise, but it seemed about the same as making a pizza. I actually found a recipe for a vegan calzone in the back of a book we own called No More Bull! to start with. The filling was extremely similar to the tofu filling I make for stuffed shells, lasagna and other Italian dishes. The main difference was that it also included a kind of "sauce" made from silken tofu and spinach. I thought this was a pretty clever idea as it creates an additional texture, similar to the combination of ricotta cheese and melted mozzarella cheese. I made a few adjustments to the suggested recipe and then jazzed it up a little with some items I think of as pizza toppings and voila! delicious calzone filling. Here are the ingredients for the filling:

1 cup cooked frozen chopped spinach, squeezed dry
4 ounces silken tofu
salt and pepper
3 cloves garlic, pressed
1/2-1 cup mushrooms, chopped
3 scallions or 1/3 of a red onion, chopped
1 16-oz package extra firm tofu, crumbled
2 tsp. dried basil
1/2 tsp. dried oregano
1/4 cup sun dried tomatoes, chopped
3 Tbsp. nutritional yeast

First, blend the spinach, silken tofu and salt and pepper until smooth. Next heat and spray a skillet with oil. Add the garlic, mushrooms and scallions or onions. Cook for about 3 minutes until the mushrooms begin to soften, then add the crumbled firm tofu, basil, oregano, sun dried tomatoes and nutritional yeast. Cook while stirring until heated through and any liquid has evaporated. Remove from heat and stir in the spinach/silken tofu mixture. Set aside.

I have to admit that I just used store bought Trader Joe's pizza dough. You can certainly make your own, but this is just so easy and I like the way the TJ's kind tastes. Split the dough in half and roll each half into a large circle on a floured surface with a rolling pin. Fill the dough with half the filling, fold it over and seal the edges. Transfer the calzone to an oiled baking sheet and bake at 375 degrees for 45 minutes. The crust should be golden brown by the time you are finished. Let the calzone cool for about 10 minutes before attempting to eat it (I know, it might be hard to wait...but in a family of brass players we are very protective not to burn our lips!)

I think I definitely rolled my dough out too much. This meant that some parts of the dough were too thin and other parts where I folded it over a second time, were too thick. This is an easy mistake to fix and I won't do it again.

I served each calzone with a generous ladle of marinara sauce. Whenever I use marinara sauce from a jar (which is often) I always like to add a few of my own touches. You would be surprised how much a few sauteed onions, garlic and mushrooms and a few shakes of basil, oregano and crushed red pepper will amp up the flavor of a store bought sauce.

I think this dish was a sure success. It doesn't look too glamorous and may not be something I serve to guests anytime soon, but we liked it a lot. The flavors are spot on and if you've never tried this sort of tofu filling for an Italian dish, you absolutely should. The resemblance to cheese is uncanny. I also liked the addition of the silken tofu sauce. I usually just add the chopped spinach right to the crumbled tofu mixture, but I really liked the variety of textures accomplished by this sauce. This is a simple, delicious and healthy weeknight meal, especially if you use store bought dough and sauce. There is no excuse not to try it out!

Saturday, October 2, 2010

And We're Back: Vegan Paella

So I'm sure you've noticed the distinct lack of blog postings in the month of September. I tried, I really did. But working 25 out of the 30 days in the month, plus many of the nights, took its toll on my blogging career. I did my best to still cook as many nights as I could, and to take pictures of the food as much as possible. I'll try to catch up over time by mixing posts of things I'm making now with posts of things I made last month.

A few weeks ago, I made the mistake of asking J one night what dishes he would like me to make that week. Not so much dishes I've made before, but random ideas of things he thought I should try. He listed off an interesting collection of items, most of which I actually did try. One of the more daunting ones was this one: Vegan Paella. I have no idea why or how this idea came into his head. I don't actually know for sure if he or I have ever actually eaten paella in our lives. Everyone sort of knows what it is...a rice dish, usually with seafood like mussels in it and saffron or something among the spices. Tomatoes maybe? I'm showing my ignorance here, but I really didn't even know where to begin.

I started by googling Vegan Paella and reading as many recipes as I could find. As is usually the case, I decided to take my favorite parts from all the recipes to create one big super-recipe. This dish is not nearly as complicated as it first seemed to me. In fact, as I'm writing this, I'm also compiling my grocery list for this week and I think I'm going to make this again. Start by gathering all the ingredients:

2 cups paella rice (I'm not sure if this is necessary but I was sufficiently convinced by everything I read that you have to buy special rice. I bought this one online)
3 Tbsp. olive oil, divided
3 artichokes, trimmed, cleaned, and quartered
12 or so green beans, trimmed
1 onion, chopped
5 cloves garlic, pressed
1 red bell pepper, chopped
2 tomatoes, chopped
1 cup frozen green peas
pinch of saffron (the good stuff, not the powder)
4 cups vegetable broth
crushed hot pepper flakes

The first step is to clean the artichoke hearts. Now, call me crazy but I had never done this before. I followed these simple directions:
1. Remove all leaves
2. Trim the end of the stem
3. Use a paring knife to remove all of the course stuff around the base of the heart
4. Peel the stem and any last bits of thick skin on the heart
5. Remove all of the the hairy choke with a sharp spoon
7. Put heart in a bowl of water with a squeeze of lemon juice to prevent browning

Doing all of this is pretty easy, but time consuming and it felt wasteful. By the time I was done with this step, I was loudly complaining to J from the kitchen about how stupid artichokes are and how I'm not using them next time. I even went so far as to take a snarky photo of (left) the part of the artichoke you don't use and (right) the part of the artichoke you do actually use. Needless to say to you artichoke enthusiasts out there, when I ate this finished dish, I completely changed my tune. Who cares how long it takes to clean them? I LOVE artichokes! Don't make this dish without them, I promise you will agree after you taste them.

Next quarter the artichokes and trim the green beans. Saute the two of them together in a little olive oil with salt and pepper until somewhat tender but not completely done. Meanwhile, heat the vegetable broth with the pinch of saffron (about 10 threads) until it simmers.


In a large pan (a paella pan or something
sort of like it), saute onion, garlic and bell pepper in 2 Tbsp. of olive oil for about 4-5 minutes. Add the rice and saute 4-5 minutes longer. Add chopped tomatoes and peas with salt and pepper to taste. Stir and then add all of the hot vegetable broth to the pan. The concept of paella is pretty much the opposite of risotto. Instead of adding the broth gradually and stirring constantly, you add the broth all at once and never stir. Let the pan simmer for about 8-10 minutes until the broth no longer covers the rice mixture. Reduce the heat to medium low and cook another 8-10 minutes until the liquid looks mostly absorbed. Sneak a bit of the rice from just below the surface. If it doesn't taste done, continue cooking a few more minutes.

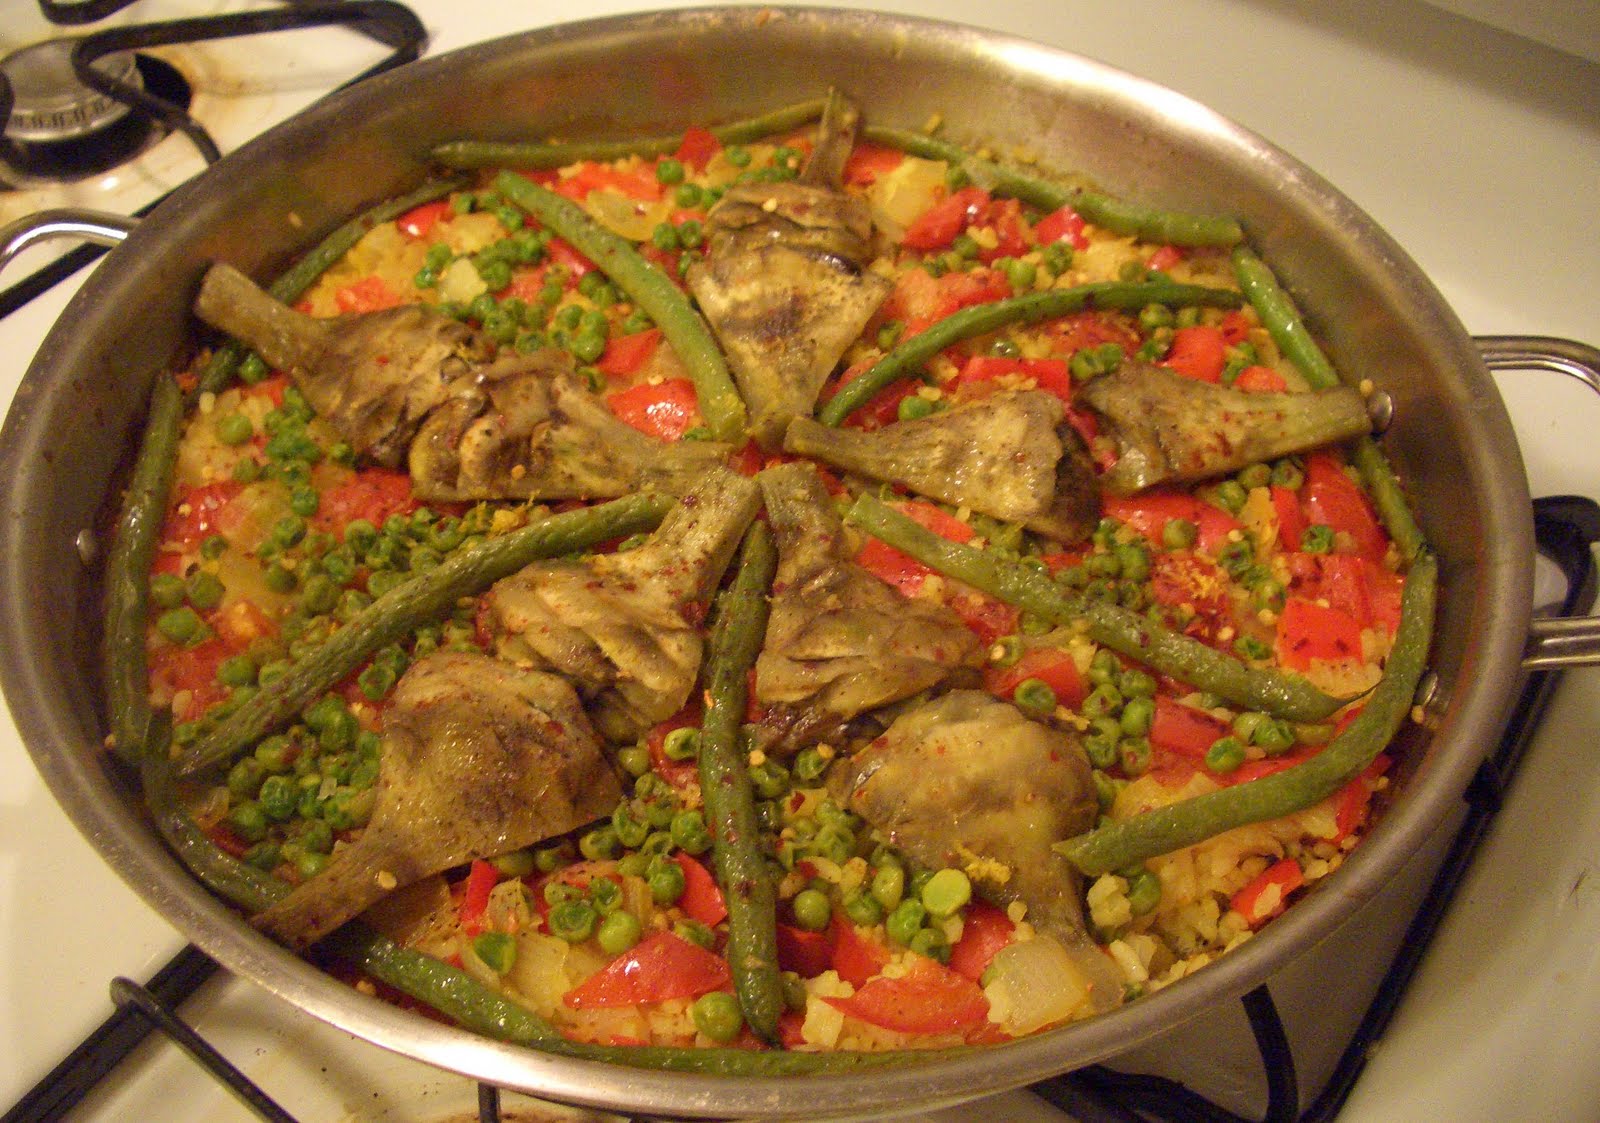
When the rice tastes mostly done, add the artichokes and green beans to the top of the dish. (You can see I made a silly design, but that's obviously not necessary!) Sprinkle a little crushed chili flakes and cover the dish with aluminum foil and cook for about 3 more minutes to assure that the top layer of rice is completely cooked. From what I've read, this last step is by far the most important. The goal of a perfect paella is to create a delicious crust on the bottom, while somehow not burning it. The last step is to turn up the heat to medium high and cook for another 2-3 minutes. You can actually hear a little bit of a crackling sound as the rice crisps up. The better your crust turns out will probably depend on how much of a dare devil you are. I left it on long enough to create a crust, but I'll probably wait a little longer next time.

This dish was incredibly delicious. Other than cleaning the artichokes, it was seriously not very difficult at all. And it looks amazingly elegant. J couldn't believe that this was something homemade when I showed it to him. This is something I will absolutely be making for company in the future. And with all the juicy and delicious vegetables, there is absolutely no need for the traditional seafood. If you try one unusual recipe this week, make it this one! And if anyone can tell me a supermarket in the Bay Area that carries paella rice, please tell me!


Monday, September 6, 2010

Baked Egg Rolls with Napa Cabbage Slaw

Post Update 1/16/11: I've made these egg rolls quite a few times since this original post and they are still a favorite with my husband, family and friends. They truly aren't too much work once you get the hang of the rolling process. I've continued to tweak the recipe and love the final product I've landed on. I've edited the recipe below to reflect changes and added some new photos to reflect my improving photo skills.

Original Post: I entered into this recipe with a lot of doubt. Crispy, crunchy egg rolls with no egg and no oil? No frying? Really?? No way. I had to try it anyway though. On the slight chance that this recipe would work, I just had to give it a shot.

About a year ago, I perfected a recipe for delicious vegan spring rolls-those are the ones wrapped in thin rice paper and filled with fresh veggies, herbs etc. They are really really good (and I'm sure will make an appearance on this blog sooner or later) and they made sense to me. A light, fresh dish with lots of crispy vegetables sounds like the kind of thing a vegan would prepare. The evil brother of the spring roll is that tempting little fried guy filled with a rich, hot filling and drenched in grease and oil. J has a specific love for these little devils, so I knew that if I could find a way to prepare them at home, he would be a very happy man. Once again, my friend at Fat Free Vegan showed me the way it could be done, although I ended up changing the recipe quite a bit in the end. This recipe is very simple, especially because you don't even have to pre-cook the filling. Just mix together the raw ingredients, wrap, and bake. The recipe is below:

1/2 head napa cabbage, chopped into fine strips
2 medium carrots, cut into matchsticks
2-3 scallions (white and green parts), chopped
2 tsp. sambal oelek (that red chili-garlic paste on the table at Chinese restaurants and for sale at Asian stores. You could use 1 tsp. Sriracha and 1 tsp. brown sugar instead if you can't find this in your stores)
6 oz. baked teriyaki style tofu, cut into small cubes
1 tsp. soy sauce
1 tsp. sesame oil
16 frozen spring roll wrappers (also at the Asian grocery near you)

These frozen spring roll wrappers are amazing. Keep them frozen until about 30 minutes before you begin to prepare your meal. Allow them to defrost at room temperature for an hour, still inside the packaging. Take them out of the wrapping and cover with a damp kitchen towel. This keeps them from drying out and will make them much easier to work with. After you mixed all filling ingredients, take one wrapper and place it on a flat surface with one corner facing you. Place about 2 heaping Tbsp. of filling in the bottom area of the wrapper and fold the bottom corner up over it. Roll the wrapper up one time, them fold each side corner tightly over the center. Roll the remaining way up and seal the top corner with a bit of water. The key is to try to roll as tightly as possible. After you make the first couple rolls, it will become very easy.

Place the assembled rolls on a lightly sprayed cookie sheet and bake at 375 degrees for about 10 minutes. Flip them over and bake another 8 minutes until golden brown. Yes, they do get golden brown. Even without the oil. These egg rolls literally blew my mind. They were so good I called my mom right away and convinced her to try them out the very next day (she and my dad loved them too). They were so good that even though I have a feeling they would freeze very well for later, J and I devoured every single one (no I'm not ashamed). These egg rolls are so good that because I didn't have time to blog about them for about a week after I first made them, I'm actually writing this as my second batch cooks in the oven! You must try this recipe!!

You can dip these egg rolls in soy sauce or any duck sauce or hot & sour sauce of your liking. I make a generic Asian dipping sauce consisting of soy sauce, water, sugar and rice wine vinegar. Whatever suits your taste.

To pair with this dish, I wanted something light and crunchy. I still had half a napa cabbage, so I decided to make a slaw that we've been making in my family for a very long time, but to substitute the napa cabbage for the regular cabbage I normally use. Mix together:

1/2 napa cabbage, cut into fine strips
1 red bell pepper, cut into small strips
2 small carrots, cut into matchsticks or shredded
2 scallions, chopped
2 tsp. sesame oil
1 tsp. soy sauce
1 tsp. rice wine vinegar
black pepper and hot pepper flakes to taste

Mix everything thoroughly and put it in the refrigerator until you are ready to eat. About an hour in the fridge helps to meld all the flavors together.


Wednesday, September 1, 2010

Collard Greens Stuffed with Red Beans and Rice


Now, I am not a Southern belle. Anyone who knows me even a little bit understands that this statement is true. But I am a lot closer to one now than I have ever been. In the past several years, I have: 1) Married a good Southern boy, 2) Spent a year living in Charleston, South Carolina, 3) Worked for a few months at a Southern cooking store and cooking school, and 4) Spent a number of major holidays with my Southern in-laws. Not a Southern belle yet, but I can officially hold my own preparing a few traditional Southern dishes...Well traditional except for the lack of bacon, lard and all things pig-related.

One thing that J and I really love is a good dish of collard greens. It gives us a break from kale (our favorite food and the subject of a blog post coming soon), and is incredibly healthy, hearty and inexpensive. This dish is nearly identical to the recipe I originally found on my beloved Fat Free Vegan blog. I changed a few spices and flavors to give it a more Southern flavor. A complete list of ingredients is below:

1 cup cooked brown rice
1 1/2 cups cooked small red beans
1 large onion, diced
1 green or yellow pepper, chopped
2-3 ribs celery, chopped
5 cloves garlic, pressed
1 15-oz can fire roasted diced tomatoes with green chiles
1/2 tsp. dried thyme
1 tsp. paprika
1 Tbsp. Tapatio or other hot sauce of your choice
1 Tbps. apple cider vinegar
1 tsp. liquid smoke
salt and pepper to taste
12 large collard leaves

First prepare the collard leaves. Buy one large bunch and then select the biggest and best 12 leaves. A bunch will usually have about 15 leaves or so but some will be small or deformed. Don't throw those ones away, just use them in your next stir fry or whatever. You can even chop them and eat them raw in a salad. You want to clean up each leaf so that it will be the perfect little wrap for your rice and bean mixture.

Wash the leaves in cold water and cut off the bottom of the leaves so that the shape is a fairly uniform circle or oval or whatever it may be. Then use a sharp, thin knife to slice out the tough part of the stem. You are basically 'de-boning' the collard. While you are cleaning up the collards, boil a large pot of salted water. In two batches of 6, blanch the leaves in the boiling water for about 2 minutes. Rinse the leaves in cold water, and set aside stacked on a flat surface.

This recipe is a great example of why I never make a little bit of rice or beans. If I'm going to spend the 45 minutes or more cooking up rice or boiling beans, I make a lot of it and try to use them in a couple dishes. Somehow they always manage to get used up. In this case you need 1 cup of cooked rice and 1 1/2 cup of cooked red beans. I guess you could use canned beans, but I think kidney beans are a little too big for this and I don't often see these little red beans in cans. It's really easy to make dry beans and I'm trying to do it more often. It's also way cheaper than the canned ones.

Heat a large skillet and saute the onion with a pinch of salt. When the onion begins to brown, add the bell pepper, celery and garlic and cook until all vegetables are tender but not done. Take about 3/4 cup of the veggie mixture and mix it with the can of fire roasted tomatoes. I put these in a blender for a little mix, but you could use it chunky if you wanted to. Set the tomato mixture aside.

Add the rice and beans to the skillet with the remaining veggies and add in the seasonings, hot sauce, vinegar, liquid smoke and about 1/4 cup of vegetable broth or water. Reduce the heat and cook on low for about 10 minutes. Remove the mixture from heat and preheat the oven to 350 degrees.

To assemble the little rolls, spoon half of the tomato mixture in the bottom of a long casserole dish. Put the first collard in front of you with the trimmed side up and the stem closest to you. Place about 3 Tbsp. of the rice/bean mixture about a quarter of the way from the bottom. Roll the bottom up once, then fold the sides over each edge. Tightly roll up the rest of the way and place into the casserole dish. Repeat 11 more times.

Once you are done, spoon the rest of the tomato mixture over the top and cover with foil. Bake the dish for about 40 minutes and you're done!

I have to admit that I love these little rolls because of how cute they are. It takes a little time to assemble them all, but once you get the hang of it, it's not a big deal. It really serves up elegantly and is another great twist on traditional beans and rice-a vegan's best friends!